"Learn RESTful API Development: Building a Social Media API with Node.js and MongoDB"
In today's interconnected world, social media has become an integral part of our lives, providing a platform for people to connect, share, and engage with one another. Behind the scenes, social media platforms rely on powerful technologies to handle the complexities of user interactions, data storage, and API communication. One such technology stack that has gained immense popularity is the combination of Node.js and MongoDB.
In this blog post, we will embark on an exciting journey of learning RESTful API development by building a social media API using Node.js and MongoDB. By following along, you will gain hands-on experience in creating a robust and scalable API that enables users to create profiles, post updates, follow other users, and much more.
So, whether you're a beginner eager to dive into backend development or an experienced developer looking to expand your skill set, this step-by-step guide will equip you with the knowledge and tools necessary to build a RESTful API from scratch. Get ready to unlock the power of Node.js and MongoDB as we embark on this thrilling adventure of building a social media API that will empower connectivity and engagement among users.
API structure:
The anatomy of a REST API (Representational State Transfer API) refers to the key components and principles that define its structure and functionality. Understanding the various elements of a REST API is essential for designing and implementing an effective and standardized API. Here are the key components of a REST API:
Endpoints: Endpoints represent the different URLs or routes that clients can interact with to perform specific operations. Each endpoint corresponds to a specific resource or a collection of resources. For example,
/usersmight represent a collection of users, while/users/{id}represents a specific user identified by the{id}parameter.HTTP Verbs/Methods: REST APIs use HTTP methods to define the type of operation to be performed on a resource. The most commonly used HTTP methods are:
GET: Retrieves a resource or a collection of resources.POST: Creates a new resource.PUT: Updates an existing resource or creates a new resource if it doesn't exist.PATCH: Partially updates an existing resource.DELETE: Deletes a resource.
Status Codes: HTTP status codes are used to indicate the status of a request. REST APIs commonly use status codes to provide feedback on the success or failure of a request. For example,
200 OKindicates a successful response,400 Bad Requestindicates a client error, and500 Internal Server Errorindicates a server error.
By understanding and incorporating these components into the design and implementation of a REST API, you can create a standardized and well-structured interface that is easy to understand, use, and maintain.
Environment setup:
Setting up a development environment for a RESTful API with Node.js involves installing the necessary tools and dependencies. Here's a step-by-step guide to get you started:
Node.js Installation: Visit the official Node.js website (nodejs.org) and download the latest LTS (Long-Term Support) version of Node.js for your operating system. Follow the installation instructions provided by the Node.js installer.
Text Editor or IDE: Choose a text editor or integrated development environment (IDE) for writing your Node.js code. Popular options include Visual Studio Code, Sublime Text, Atom, or WebStorm. Install and configure your preferred editor according to your needs.
Create a New Project Directory: Create a new directory for your project. Open a terminal or command prompt, navigate to the desired location, and create a new folder using the following command:
 mkdir social_media_rest_api
 cd my-rest-api
Initialize a Node.js Project: Initialize a new Node.js project using npm (Node Package Manager) by running the following command in your project directory:
npm initThis command creates a new
package.jsonfile that will track your project's dependencies and configuration.Install Required Dependencies: Install the necessary dependencies for your RESTful API project. Some commonly used dependencies for building REST APIs with Node.js include:
Express.js: A popular web framework for Node.js.
Mongoose: A MongoDB object modelling library.
body-parser: Middleware for parsing incoming request bodies.
dotenv: A module for managing environment variables.
Nodemon: Automatically restarts your Node.js application when you make changes to your code.
bcrypt: bcrypt is a password hashing function that is used to protect passwords from being cracked.
Helmet: Provides several security features to help protect your application from attacks.
Morgan: Morgan is a Node.js package that provides a flexible logging system for your application.
Install these dependencies by running the following command:
    npm i express mongoose body-parser dotenv helmet morgan bcrypt
     nodemon
Create the Entry Point: Create a new file named
index.js(or any other preferred name) as the entry point of your API. This file will contain the initial setup and configuration for your API.// index.js // Import required modules const express = require("express"); const mongoose = require("mongoose"); const dotenv = require("dotenv"); const bodyParser = require("body-parser"); const helmet= require("helmet"); const morgan = require("morgan"); dotenv.config(); // Create an Express app const app = express(); // Middleware setup app.use(bodyParser.urlencoded({ extended: false })); app.use(bodyParser.json()); app.use(helmet()); app.use(morgan("common")); // Start the server const port = process.env.PORT || 3300; app.listen(port, () => { console.log(`Server running on port ${port}`); });This sets up the basic structure of your API, imports the required modules, and starts an Express server.
Set up MongoDB Connection: If your RESTful API will use a MongoDB database, you'll need to set up a connection to the database. Update the
index.jsfile to include the MongoDB connection code:// Connect to MongoDB mongoose .connect(process.env.MONGODB_URL, { useNewUrlParser: true, useUnifiedTopology: true, }) .then(() => { console.log('Connected to MongoDB'); }) .catch((error) => { console.error('MongoDB connection error:', error); });Make sure to provide the MongoDB connection string through an environment variable (
process.env.MONGODB_URL). You can either set the environment variable directly or use a.envfile and thedotenvmodule to manage it.Start the API: To start your RESTful API, run the following command in the project directory:
 for windows
 nodemon index.js
 for linux
 npx nodemon index.js
File hierarchy:
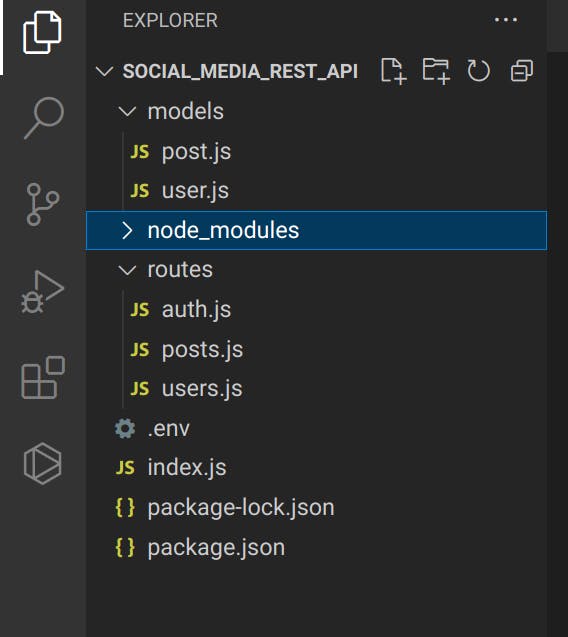
Models:
Now we will create a user and post model using Mongoose in our application. The user model defines the structure and properties of a user object in the MongoDB database and post model defines the structures and properties of a post object.First we will require mongoose
const mongoose = require("mongoose");
Users Model:
We need to create the user model in /models/user.js, the userSchema contains all the details of the user required in a social media app, ranging from the username, and profile picture to followers and posts. isAdmin is used to verify if a user is an admin. The timestamp is used to save time when any new user is created or updated.
const UserSchema = new mongoose.Schema( { username: { type: String, require: true, min: 3, max: 20, unique: true, }, email: { type: String, required: true, max: 50, unique: true, }, password: { type: String, required: true, min: 6, }, profilePicture: { type: String, default: "", }, coverPicture: { type: String, default: "", }, followers: { type: Array, default: [], }, followings: { type: Array, default: [], }, isAdmin: { type: Boolean, default: false, }, bio: { type: String, max: 50, }, city: { type: String, max: 50, }, }, { timestamps: true } );module.exports = mongoose.model("User", UserSchema);This exports the user model by creating a Mongoose model named "User" using the defined user schema. The model allows you to perform CRUD operations on user documents in the MongoDB database.
By using this user model, you can create, read, update, and delete user documents in your Node.js application.
Post Model:
We need to create the post model in /models/post.js, the postSchema contains all the details of the post required in a social media app, ranging from the description to likes. The timestamp is used to save time when any new user is created or updated.
 const PostSchema = new mongoose.Schema(
   {
     userId: {
       type: String,
       required: true,
     },
     desc: {
       type: String,
       max: 500,
     },
     img: {
       type: String,
     },
     likes: {
       type: Array,
       default: [],
     },
   },
   { timestamps: true }
 );

 module.exports = mongoose.model("Post", PostSchema);
This exports the Mongoose model for the "Post" schema. It creates a model named "Post" based on the provided schema. The model allows you to interact with the MongoDB collection associated with the "Post" schema, enabling CRUD operations (create, read, update, delete) on post documents.
By using this "Post" model, you can perform database operations related to posts, such as creating new posts, retrieving existing posts, updating post information, and deleting posts in your Node.js application.
Routes:
const router = require("express").Router();
require("express")imports the Express module, which provides various functionalities for building web applications..Router()creates a new router object that can be used to define routes and middleware specific to this router.
By assigning the result of express.Router() to the router variable, you now have an instance of the Express router that can be used to handle HTTP requests for specific routes.
You can then define routes and middleware specific to this router by attaching them to the router object, such as:
router.get("/", (req, res) => {
  res.send("Hello, World!");
});
In this example, a GET request to the root route ("/") will respond with the message "Hello, World!".
Once you have defined your routes and middleware on the router object, you can use it in your application by registering it with the main Express application(index.js) by importing and using app.use() or by mounting it on a specific path using app.use("/path", router).
const userRoute= require("./routes/users");
const authRoute= require("./routes/auth");
const postRoute = require("./routes/posts");


app.use("/api/users", userRoute);
app.use("/api/auth", authRoute);
app.use("/api/posts", postRoute);
This example mounts the router on the "/api" path, so any routes defined within the router will be accessible under the "/api" path.
By utilizing the Router module, you can modularize and organize your routes and middleware in a structured manner within your Node.js and Express application.
For auth endpoints:
Now we will write all the route handlers for auth operations which will include user registration and login, we will start by requiring the user model as well as the bcrypt package.
const router = require("express").Router();
const User = require("../models/user");
const bcrypt = require("bcrypt");
Register endpoint:
  router.post("/register", async (req, res) => {
    try {
      //generate new password
      const salt = await bcrypt.genSalt(10);
      const hashedPassword = await bcrypt.hash(req.body.password, salt);

      //create new user
      const newUser = new User({
        username: req.body.username,
        email: req.body.email,
        password: hashedPassword,
      });

      //save user and respond
      const user = await newUser.save();
      res.status(200).json(user);
    } catch (err) {
      res.status(500).json(err);
    }
  });
This route handler handles a POST request to the "/register" endpoint.
router.post("/register", async (req, res) => { ... }): Registers a POST route for the "/register" endpoint. It listens for incoming POST requests to this endpoint.try { ... } catch (err) { ... }: Wraps the code within a try-catch block to handle any potential errors that may occur during the execution of the code.const salt = await bcrypt.genSalt(10);: Generates a salt using thebcrypt.genSalt()function. The salt is a random string used for hashing passwords.const hashedPassword = await bcrypt.hash(req.body.password, salt);: Hashes the password provided in the request body (req.body.password) using the generated salt. Thebcrypt.hash()function asynchronously hashes the password.const newUser = new User({ ... }): Creates a new instance of the User model with the provided user data. The user data is extracted from the request body (req.body.username,req.body.email,hashedPassword).const user = awaitnewUser.save();: Saves the new user to the database using thesave()method. This asynchronously saves the user instance to the MongoDB database.res.status(200).json(user);: If the user is successfully saved, it sends a JSON response with a status code of 200 (OK) and the saved user data.res.status(500).json(err);: If an error occurs during the execution of the code (e.g., database error), it sends a JSON response with a status code of 500 (Internal Server Error) and the error message.
Login endpoint:
  router.post("/login", async (req, res) => {
    try {
      const user = await User.findOne({ email: req.body.email });
      !user && res.status(404).json("user not found");

      const validPassword = await bcrypt.compare(req.body.password, user.password)
      !validPassword && res.status(400).json("wrong password")

      res.status(200).json(user)
    } catch (err) {
      res.status(500).json(err)
    }
  });
This route handler handles a POST request to the "/login" endpoint.
router.post("/login", async (req, res) => { ... }): Registers a POST route for the "/login" endpoint. It listens for incoming POST requests to this endpoint.const user = await User.findOne({ email:req.body.email});: Retrieves a user from the database by searching for a matching email in the User collection. The email is extracted from the request body (req.body.email).!user && res.status(404).json("user not found");: Checks if a user with the provided email exists in the database. If the user does not exist, it sends a JSON response with a status code of 404 (Not Found) and the message "user not found".const validPassword = awaitbcrypt.compare(req.body.password, user.password);: Compares the password provided in the request body (req.body.password) with the hashed password stored in the retrieved user object. Thebcrypt.compare()function asynchronously compares the passwords and returns a boolean indicating whether they match.!validPassword && res.status(400).json("wrong password");: Checks if the provided password is valid (i.e., it matches the hashed password stored in the database). If the password is incorrect, it sends a JSON response with a status code of 400 (Bad Request) and the message "wrong password".
For user's endpoints:
Now we will write all the route handlers for users which will include user update, delete, follow, and unfollow, we will start by requiring the user model as well as the bcrypt package.
const router = require("express").Router();
const User = require("../models/user");
const bcrypt = require("bcrypt");
Update user:
  router.put("/:id", async (req, res) => {
    if (req.body.userId === req.params.id || req.body.isAdmin) {
      if (req.body.password) {
        try {
          const salt = await bcrypt.genSalt(10);
          req.body.password = await bcrypt.hash(req.body.password, salt);
        } catch (err) {
          return res.status(500).json(err);
        }
      }
      try {
        const user = await User.findByIdAndUpdate(req.params.id, {
          $set: req.body,
        });
        res.status(200).json("Account has been updated");
      } catch (err) {
        return res.status(500).json(err);
      }
    } else {
      return res.status(403).json("You can update only your account!");
    }
  });
This route handler handles a PUT request to update a user's account based on the provided user ID (
req.params.id).router.put("/:id", async (req, res) => { ... }): Registers a PUT route with a dynamic parameter for the user ID ("/:id"). It listens for incoming PUT requests to this endpoint.if (req.body.userId ===req.params.id|| req.body.isAdmin) { ... } else { ... }: Checks if the user performing the update is either the same user (based on theuserIdprovided in the request body) or an admin (isAdminflag in the request body). If the condition is met, the update process continues; otherwise, it sends a JSON response with a status code of 403 (Forbidden) and the message "You can update only your account!".if (req.body.password) { ... }: Checks if a new password is provided in the request body. If a new password is provided, the code proceeds to hash the password before updating the account.const salt = await bcrypt.genSalt(10);: Generates a new salt using thebcrypt.genSalt()function.req.body.password = await bcrypt.hash(req.body.password, salt);: Hashes the new password provided in the request body using the generated salt. Thebcrypt.hash()function asynchronously hashes the password.const user = await User.findByIdAndUpdate(req.params.id, { $set: req.body });: Updates the user's account in the database using theUser.findByIdAndUpdate()method. It finds the user by the provided ID and sets the user document's fields based on the updated data in the request body (req.body).
Delete a user:
  router.delete("/:id", async (req, res) => {
    if (req.body.userId === req.params.id || req.body.isAdmin) {
      try {
        await User.findByIdAndDelete(req.params.id);
        res.status(200).json("Account has been deleted");
      } catch (err) {
        return res.status(500).json(err);
      }
    } else {
      return res.status(403).json("You can delete only your account!");
    }
  });
This route handler handles a DELETE request to delete a user's account based on the provided user ID (
req.params.id).router.delete("/:id", async (req, res) => { ... }): Registers a DELETE route with a dynamic parameter for the user ID ("/:id"). It listens for incoming DELETE requests to this endpoint.if (req.body.userId ===req.params.id|| req.body.isAdmin) { ... } else { ... }: Checks if the user performing the delete operation is either the same user (based on theuserIdprovided in the request body) or an admin (isAdminflag in the request body). If the condition is met, the delete operation continues; otherwise, it sends a JSON response with a status code of 403 (Forbidden) and the message "You can delete only your account!".await User.findByIdAndDelete(req.params.id);: Deletes the user's account from the database using theUser.findByIdAndDelete()method. It finds the user by the provided ID and removes the corresponding document from the User collection.
Get a user:
  router.get("/:id", async (req, res) => {
    try {
      const user = await User.findById(req.params.id);
      const { password, updatedAt, ...other } = user._doc;
      res.status(200).json(other);
    } catch (err) {
      res.status(500).json(err);
    }
  });
This route handler handles a GET request to retrieve a user's information based on the provided user ID (
req.params.id).router.get("/:id", async (req, res) => { ... }): Registers a GET route with a dynamic parameter for the user ID ("/:id"). It listens for incoming GET requests to this endpoint.const user = await User.findById(req.params.id);: Retrieves the user's document from the database using theUser.findById()method. It finds the user by the provided ID (req.params.id).const { password, updatedAt, ...other } = user._doc;: Destructures theuser._docobject to extract specific fields from the user document. It excludes thepasswordandupdatedAtfields, while keeping all other fields.
Follow a user:
  router.put("/:id/follow", async (req, res) => {
    if (req.body.userId !== req.params.id) {
      try {
        const user = await User.findById(req.params.id);
        const currentUser = await User.findById(req.body.userId);
        if (!user.followers.includes(req.body.userId)) {
          await user.updateOne({ $push: { followers: req.body.userId } });
          await currentUser.updateOne({ $push: { followings: req.params.id } });
          res.status(200).json("user has been followed");
        } else {
          res.status(403).json("you already follow this user");
        }
      } catch (err) {
        res.status(500).json(err);
      }
    } else {
      res.status(403).json("you can't follow yourself");
    }
  });
This route handler handles a PUT request to allow a user to follow another user.
router.put("/:id/follow", async (req, res) => { ... }): Registers a PUT route with a dynamic parameter for the user ID ("/:id/follow"). It listens for incoming PUT requests to this endpoint.if (req.body.userId !==req.params.id) { ... } else { ... }: Checks if the user performing the follow operation is not the same as the user being followed. If the condition is met, the follow operation continues; otherwise, it sends a JSON response with a status code of 403 (Forbidden) and the message "you can't follow yourself".const user = await User.findById(req.params.id);: Retrieves the user being followed from the database using theUser.findById()method. It finds the user by the provided ID (req.params.id).const currentUser = await User.findById(req.body.userId);: Retrieves the current user who is performing the follow action from the database using theUser.findById()method. It finds the user by the ID provided in the request body (req.body.userId).if (!user.followers.includes(req.body.userId)) { ... } else { ... }: Checks if the current user is not already following the user being followed. If the condition is met, the code proceeds with the follow operation; otherwise, it sends a JSON response with a status code of 403 (Forbidden) and the message "you already follow this user".await user.updateOne({ $push: { followers: req.body.userId } });: Updates the followers array of the user being followed by adding the ID of the current user to the array. It uses theupdateOne()method to perform the update operation.await currentUser.updateOne({ $push: { followings:req.params.id} });: Updates the followings array of the current user by adding the ID of the user being followed to the array. It uses theupdateOne()method to perform the update operation.
Unfollow a user:
router.put("/:id/unfollow", async (req, res) => {
  if (req.body.userId !== req.params.id) {
    try {
      const user = await User.findById(req.params.id);
      const currentUser = await User.findById(req.body.userId);
      if (user.followers.includes(req.body.userId)) {
        await user.updateOne({ $pull: { followers: req.body.userId } });
        await currentUser.updateOne({ $pull: { followings: req.params.id } });
        res.status(200).json("user has been unfollowed");
      } else {
        res.status(403).json("you don't follow this user");
      }
    } catch (err) {
      res.status(500).json(err);
    }
  } else {
    res.status(403).json("you can't unfollow yourself");
  }
});
This route handler handles a PUT request to allow a user to unfollow another user.
router.put("/:id/unfollow", async (req, res) => { ... }): Registers a PUT route with a dynamic parameter for the user ID ("/:id/unfollow"). It listens for incoming PUT requests to this endpoint.if (req.body.userId !==req.params.id) { ... } else { ... }: Checks if the user performing the unfollow operation is not the same as the user being unfollowed. If the condition is met, the unfollow operation continues; otherwise, it sends a JSON response with a status code of 403 (Forbidden) and the message "you can't unfollow yourself".const user = await User.findById(req.params.id);: Retrieves the user being unfollowed from the database using theUser.findById()method. It finds the user by the provided ID (req.params.id).const currentUser = await User.findById(req.body.userId);: Retrieves the current user who is performing the unfollow action from the database using theUser.findById()method. It finds the user by the ID provided in the request body (req.body.userId).if (user.followers.includes(req.body.userId)) { ... } else { ... }: Checks if the current user is following the user being unfollowed. If the condition is met, the code proceeds with the unfollow operation; otherwise, it sends a JSON response with a status code of 403 (Forbidden) and the message "you don't follow this user".await user.updateOne({ $pull: { followers: req.body.userId } });: Updates the followers array of the user being unfollowed by removing the ID of the current user from the array. It uses the$pulloperator in theupdateOne()method to perform the update operation.await currentUser.updateOne({ $pull: { followings:req.params.id} });: Updates the followings array of the current user by removing the ID of the user being unfollowed from the array. It uses the$pulloperator in theupdateOne()method to perform the update operation.
For posts endpoint:
Now we will write all the route handlers for posts which will include create post, delete post, like/dislike post and timeline, we will start by requiring the post model as well as the bcrypt package.
const router = require("express").Router();
const Post = require("../models/Post");
const User = require("../models/User");
Create a post:
  router.post("/", async (req, res) => {
    const newPost = new Post(req.body);
    try {
      const savedPost = await newPost.save();
      res.status(200).json(savedPost);
    } catch (err) {
      res.status(500).json(err);
    }
  });
This route handler handles a POST request to create a new post.
router.post("/", async (req, res) => { ... }): Registers a POST route ("/"). It listens for incoming POST requests to this endpoint.const newPost = new Post(req.body);: Creates a new instance of the Post model, using the request body (req.body) as the data for the new post.try { ... } catch (err) { ... }: Wraps the code in a try-catch block to handle any errors that may occur during the execution.const savedPost = awaitnewPost.save();: Saves the new post to the database using thesave()method. It waits for the asynchronous operation to complete using theawaitkeyword and assigns the saved post to thesavedPostvariable.
Update a post:
  router.put("/:id", async (req, res) => {
    try {
      const post = await Post.findById(req.params.id);
      if (post.userId === req.body.userId) {
        await post.updateOne({ $set: req.body });
        res.status(200).json("the post has been updated");
      } else {
        res.status(403).json("you can update only your post");
      }
    } catch (err) {
      res.status(500).json(err);
    }
  });
This route handler handles a PUT request to update a post.
router.put("/:id", async (req, res) => { ... }): Registers a PUT route with a dynamic parameter for the post ID ("/:id"). It listens for incoming PUT requests to this endpoint.const post = await Post.findById(req.params.id);: Retrieves the post from the database using thePost.findById()method. It finds the post by the provided ID (req.params.id).if (post.userId === req.body.userId) { ... } else { ... }: Checks if the user updating the post is the same as the user who originally created the post. If the condition is met, the code proceeds with the update operation; otherwise, it sends a JSON response with a status code of 403 (Forbidden) and the message "You can update only your post".await post.updateOne({ $set: req.body });: Updates the post using theupdateOne()method. It sets the post data with the requested body data (req.body), effectively updating the post.
Delete a post:
  router.delete("/:id", async (req, res) => {
    try {
      const post = await Post.findById(req.params.id);
      if (post.userId === req.body.userId) {
        await post.deleteOne();
        res.status(200).json("the post has been deleted");
      } else {
        res.status(403).json("you can delete only your post");
      }
    } catch (err) {
      res.status(500).json(err);
    }
  });
This route handler handles a DELETE request to delete a post.
router.delete("/:id", async (req, res) => { ... }): Registers a DELETE route with a dynamic parameter for the post ID ("/:id"). It listens for incoming DELETE requests to this endpoint.if (post.userId === req.body.userId) { ... } else { ... }: Checks if the user deleting the post is the same as the user who originally created the post. If the condition is met, the code proceeds with the deletion; otherwise, it sends a JSON response with a status code of 403 (Forbidden) and the message "you can delete only your post".await post.deleteOne();: Deletes the post using thedeleteOne()method. It removes the post from the database.
Like/Dislike a post:
  router.put("/:id/like", async (req, res) => {
    try {
      const post = await Post.findById(req.params.id);
      if (!post.likes.includes(req.body.userId)) {
        await post.updateOne({ $push: { likes: req.body.userId } });
        res.status(200).json("The post has been liked");
      } else {
        await post.updateOne({ $pull: { likes: req.body.userId } });
        res.status(200).json("The post has been disliked");
      }
    } catch (err) {
      res.status(500).json(err);
    }
  });
This route handler handles a PUT request to like or dislike a post.
router.put("/:id/like", async (req, res) => { ... }): Registers a PUT route with a dynamic parameter for the post ID ("/:id/like"). It listens for incoming PUT requests to this endpoint.if (!post.likes.includes(req.body.userId)) { ... } else { ... }: Checks if the user has already liked the post. If the user has not liked the post (i.e., their user ID is not included in thelikesarray of the post), the code proceeds with liking the post. Otherwise, it proceeds with disliking the post.await post.updateOne({ $push: { likes: req.body.userId } });: If the user has not liked the post, it uses theupdateOne()method to push the user ID (req.body.userId) to thelikesarray of the post, effectively liking the post.await post.updateOne({ $pull: { likes: req.body.userId } });: If the user has already liked the post, it uses theupdateOne()method to pull (remove) the user ID (req.body.userId) from thelikesarray of the post, effectively disliking the post.
Get a post:
  router.get("/:id", async (req, res) => {
    try {
      const post = await Post.findById(req.params.id);
      res.status(200).json(post);
    } catch (err) {
      res.status(500).json(err);
    }
  });
This route handler handles a GET request to retrieve a post by its ID.
router.get("/:id", async (req, res) => { ... }): Registers a GET route with a dynamic parameter for the post ID ("/:id"). It listens for incoming GET requests to this endpoint.const post = await Post.findById(req.params.id);: Retrieves the post from the database using thePost.findById()method. It finds the post by the provided ID (req.params.id).res.status(200).json(post);: Sends a JSON response with a status code of 200 (OK) and the retrieved post object as the response body. Thepostobject contains the post details such as the post content, author, likes, comments, etc.
Get timeline posts:
  router.get("/timeline/all", async (req, res) => {
    try {
      const currentUser = await User.findById(req.body.userId);
      const userPosts = await Post.find({ userId: currentUser._id });
      const friendPosts = await Promise.all(
        currentUser.followings.map((friendId) => {
          return Post.find({ userId: friendId });
        })
      );
      res.json(userPosts.concat(...friendPosts));
    } catch (err) {
      res.status(500).json(err);
    }
  });
This route handler handles a GET request to retrieve timeline posts.
router.get("/timeline/all", async (req, res) => { ... }): Registers a GET route for retrieving timeline posts ("/timeline/all"). It listens for incoming GET requests to this endpoint.const currentUser = await User.findById(req.body.userId);: Retrieves the current user from the database using theUser.findById()method. It finds the user based on the ID provided in the request body (req.body.userId).const userPosts = await Post.find({ userId: currentUser._id });: Retrieves the posts belonging to the current user. It uses thePost.find()method with a query to find all posts where theuserIdmatches the current user's ID (currentUser._id).const friendPosts = await Promise.all(...);: Retrieves the posts of the current user's friends. It usesPromise.all()to handle multiple asynchronous operations. InsidePromise.all(), it maps through each friend ID incurrentUser.followingsand returns a promise to find posts where theuserIdmatches the friend's ID (friendId). This creates an array of promises.res.json(userPosts.concat(...friendPosts));: Sends a JSON response with the timeline posts. It concatenates the user's posts (userPosts) and the friend's posts (friendPosts) using theconcat()method. This results in an array of all the timeline posts, which is sent as the response.
In the end we have to export the router instance so that it can be used in other files.
module.exports = router;
.env
create a .env file so that we can store sensitive information like MongoDB URL.
MONGO_URL = "mongodb+srv://<userid>:<password>@cluster0.xu3u75q.mongodb.net/"
Once you start it in terminal

Testing in Postman:
User registration:
We can see the user has been registered and the status code is 200.
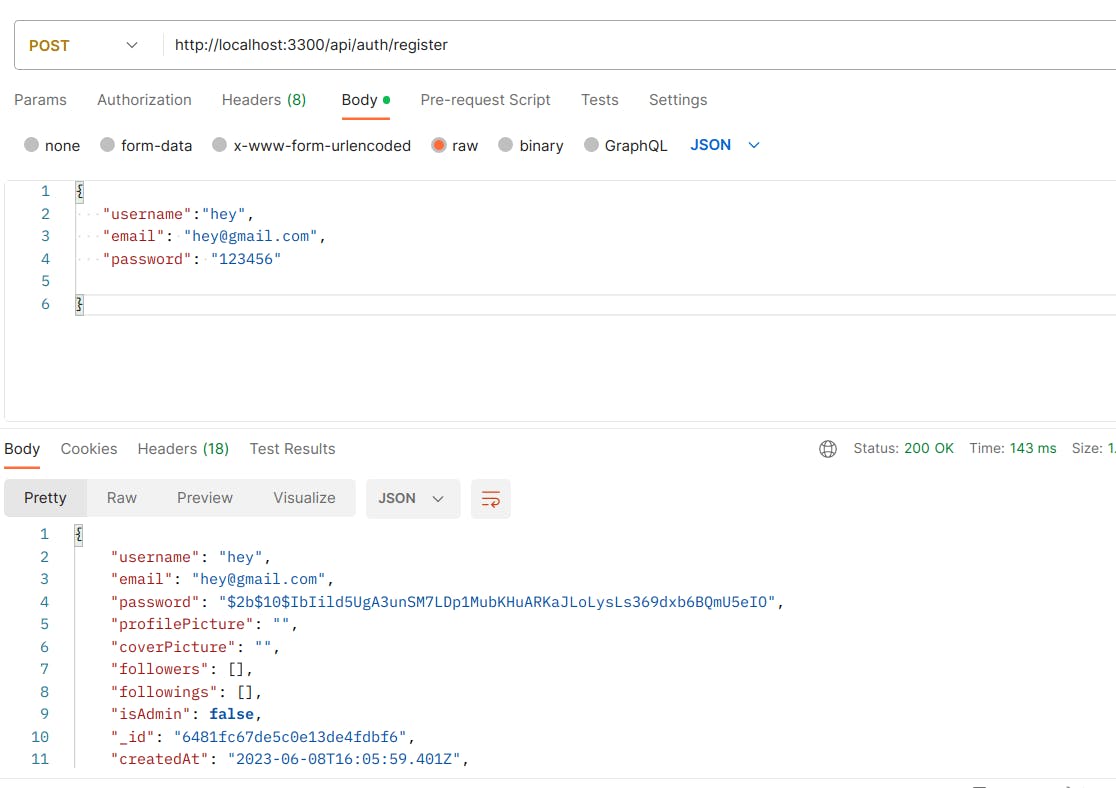
We can see the registered user in Mongodb

The terminal at this time looks like this due to the package morgan, it gives the time stamp, method, URL, status code and time for which the call took place.

Followers/Following:
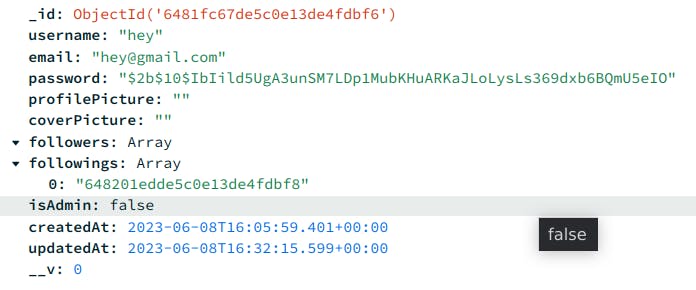
Hey has followed Aman and it is visible in database

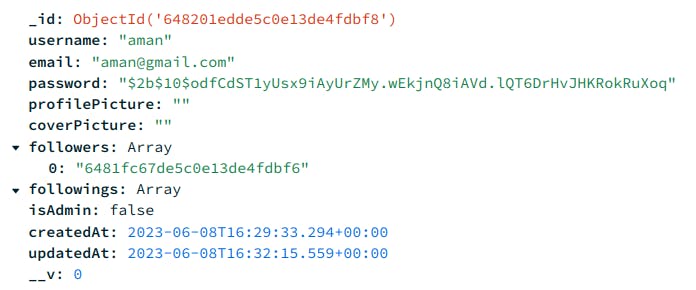
Similarly, we can use all other methods and try playing with them either on postman or the browser.
In conclusion, building a RESTful API for a social media application using Node.js and MongoDB can be an exciting and rewarding experience. Throughout this blog, we have covered the essential components and functionalities of a REST API, including user registration, authentication, profile management, post creation, and interaction with other users.Refer to the code base https://github.com/akashyap25/social_media_rest_api . See you in the next blog till then Happy coding!
